Like everyone, I come across many usability-related pain areas in the software, websites and devices that I use regularly. Some of these are caused by bugs and others, by basic design flaws. Over the years, I’ve used some tools and techniques to overcome these problems and improve the UX.
Here’s a collection of my UX hacks, in no specific order.
#1. MERCURY READER
Problem: Painful to read core content on cluttered websites.
Solution:
Read these webpages via Mercury Reader. This nifty Chrome Extension strips a webpage of banners, ads and other distractions, thus enhancing the reading experience.
Have a look at Times of India. As you can see, the webpage is very busy (Exhibit 1).
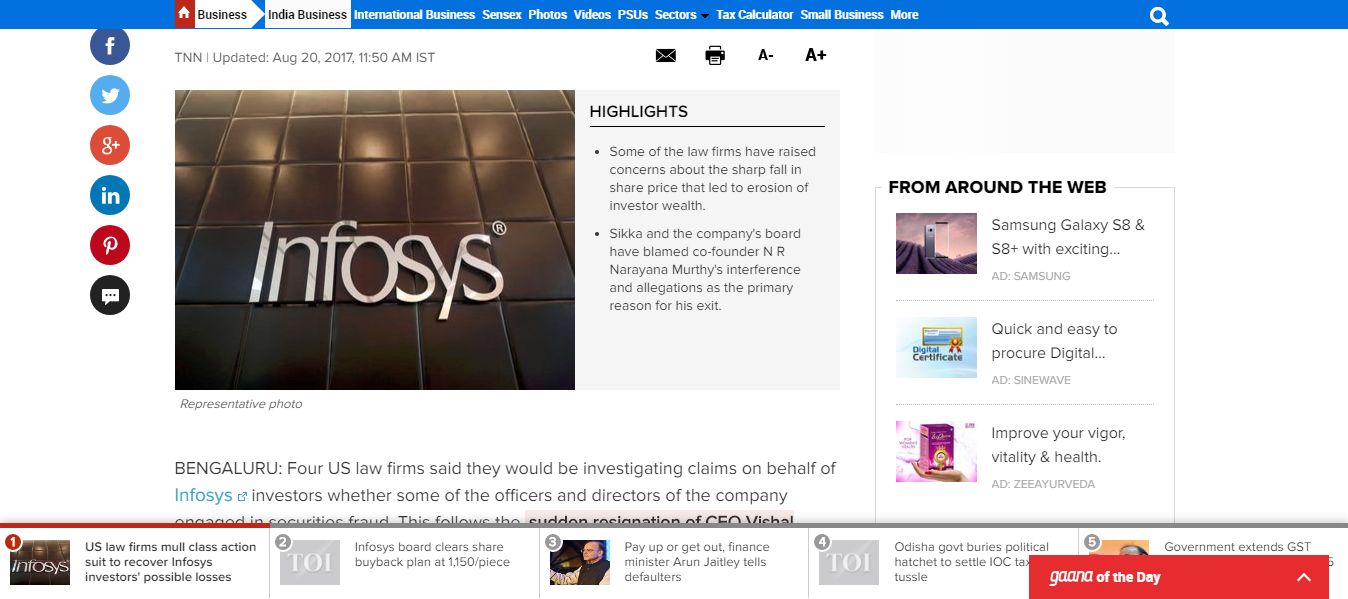
Now, click the Mercury Reader button on the Chrome Extensions panel. You can see a clean version of the page with all the distracting material stripped off (Exhibit 2).

You can send the cleaned-up page to Kindle or share it on Facebook, Twitter and Email. If you want to save it as a PDF file, follow these steps:
- Click inside Mercury Reader frame
- Right click and select Print, or type Ctrl+P, to open the Chrome Print menu
- Set Destination to Save as PDF.
- Click the Save button.
Voilà. You now have a clean PDF of the webpage.
#ProTip: In my experience, the clutter on many pages is not merely restricted to the left and right hand sides of the page – it can extend for many pages after the core content has ended. To avoid saving all the junk in your PDF file, scroll through the Preview window on the Chrome Print menu, spot the last page of the core content (say 7), enter “1-7” in the Pages box instead of leaving it at the default value of All, and click Save. This will save only the first seven pages – i.e. core content – to the PDF file.
Alternative @ 18 Jan 2022: outline.com website. Apart from cleaning up the webpage, this website also bypasses the paywall on a number of media websites.
#2. LINER
Problem: Many people find it hard to read long articles onscreen without having a pen and paper beside them to take notes.
This is how, I read @TheKenWeb everyday. Taking notes! A wonderful learning experience. pic.twitter.com/H1tKWlm0L8
— Deepak K Viswanathan (@DeepakVisva) March 24, 2017
Solution:
While there’s nothing wrong with pen and paper, there are some advantages of “going digital” while taking notes. LINER is a Chrome Extension that lets you highlight passages on a webpage and attach notes to them. Unlike good old bookmarking tools like del.icio.us that let you only bookmark a full page, Liner allows you to highlight a specific portion of a webpage in which you’re interested (“Highlight”).
Liner works as follows: Select one or more paragraphs on a webpage (example) and click the Liner button on the Chrome Extensions Panel. This will change the color of your selection to yellow (by default, but you can change it to your favorite color).
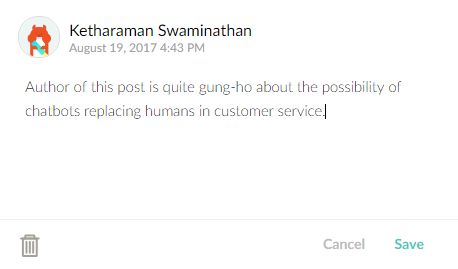
You can add a note to your Highlight (see Exhibit 3).
Apart from online notes, Liner has another great feature, which is especially useful for content marketing professionals: It gives you a URL for your Highlight within a webpage e.g. http://lnr.li/HhfkA. This is unlike a standard page URL that drops you at the top of a webpage.
To collect the Liner URL, click the Copy Link button displayed on the Liner box that pops up as soon as you click the Liner button (see Exhibit 4).
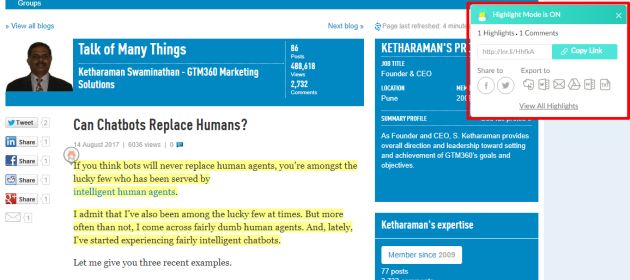
You can share the Liner URL via Email and Social Networks. When your recipient clicks it, they will reach your highlight on the given webpage.
By sending a Liner URL to someone, you can draw their attention to the specific portion on a webpage that is relevant to a given context – instead of dumping the URL of the webpage on them and expecting them to take the trouble of finding the proverbial needle in the haystack.
You can also export your Highlights to popular apps like Word, Email, Google Drive, Evernote, and so on.
All your Highlights are stored in the Liner Dashboard, from where you can access a specific Highlight via browse or search (premium feature).
#ProTip: If you want a tool for annotating and adding notes to PDFs in your local hard drive, I recommend Adobe Acrobat Reader DC, a free desktop software from Adobe Systems Inc.
Alternative @ 18 Jan 2022: The latest version of Chrome browser includes rudimentary features of Liner.
#3. MP3 TAGGING
Problem:
Phantom names of MP3 files copied from a Laptop to a Smartphone.
I started listening to music on my mobile phone well before smartphones and streaming sites came into existence.
As I wrote in How Mobile Phone MP3 Players Have Changed Lifestyles over a decade ago, I’ve accumulated a sizeable collection of songs on my Laptop, from where I sideload a bunch of them to my smartphone.
While smartphones have kept pace with laptops with respect to RAM capacities (e.g. 4GB on both), they still lag laptops by a mile when it comes to storage (e.g. 32GB on Smartphone versus 1TB on Laptop). As a result, the hard disk on my Laptop continues to be my “Single Source of Truth” for my digital music collection and I continue to copy songs from my Laptop to my Smartphone periodically to this day.
While assembling my collection of digital music on the Laptop, I take the trouble to name MP3 files by their song names (e.g. PF Wish You Were Here.mp3). As a result, when I play them using (say) Windows Media Player, the song names display correctly on the Laptop. However, once I sideload them to the Smartphone, these songs lose their original filenames and show up under phantom names (e.g. TRACK03) while I listen to them on the Smartphone’s Music Player app. This mars the music-listening experience and makes it painful to create Playlists on the Smartphone.
Solution:
Use MP3TAG software to process the MP3 files on the Laptop before copying them to the Smartphone.
Steps:
- Open mp3tag app on the Laptop
- Select the Source Folder on the Laptop containing the song collection you want to copy to the Smartphone
- Drag the Source Folder and drop on the RHS pane of mp3tag’s dashboard
- Click Ctrl-A to select all files displayed in the mp3tag pane
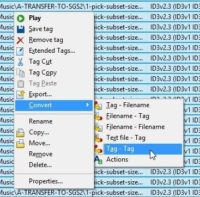
- Right Click to open conversion menu, then click Convert > Tag-Tag (Exhibit 5)
- Set “Field” = TITLE
- Click small right arrow next to “Format string:” field
- From next screen, select “Information Fields” > filename
- Click OK
- All files will be “renamed”. The file names themselves won’t change but the TITLE of each file will be corrected from the spurious one (e.g. TRACK03) to the proper song name
- Sideload the songs from the Laptop to the Smartphone via USB cable / Bluetooth.
- When you open the Music Player app on the Smartphone and tap Refresh, you will see all songs appearing by their name. Mission accomplished!
- As a housekeeping step, right click the file selection on mp3tag RHS pane and click Remove. This cleans up mp3tag and makes it ready for the next conversion session. Don’t worry, this command does not delete the files in the Source Folder.
This hack is courtesy my friend Gunwant Suryawanshi.
#FunFact: mp3tag works in-situ i.e. it processes files in their original location. This is unlike Dropbox and many other desktop applications that copy files into a proprietary folder, which is a waste of storage space and a cause of version management headaches.
I hope you find these hacks useful.
If you have any UX hacks of your own, please share them in the comments. Thanks in advance.

